Monday, September 10, 2012

S'mores Cupcakes

Crumbly graham cracker cake filled with chocolate ganache and topped with gooey marshmallow creme. 


I know its been a while but i'm back! Summer was so nice. There were lots of trips to the beach, my family came to visit and I started a new job that I'm really enjoying. There wasn't much baking, and most cooking project involved simple grilling so you didn't miss much.

I had told the people at my new job that I liked to bake. During my second week there was a bake sale to raise money for charity so it was the perfect opportunity to show off my skills. I decided I wanted to make something summery- so I had the idea of s'mores. I dare you to try to find someone who dislikes s'mores. They don't exist. Everyone loves them and eating them brings back memories of childhood summers. Luckily Bon Appetit had test driven this recipe for me so I only had to make a few adaptions.

S'mores Cupcakes
adapted from Bon Appetit
makes 12 cupcakes

Ingredients
1 1/2 cup graham cracker crumbs (about 15 whole crackers)
1/2 cup all purpose flour
2 1/2 teaspoons baking powder
1/2 cup unsalted butter, room temperature
3/4 cups sugar
2 large eggs
1 teaspoon vanilla extract
3/4 cup whole milk
8 ounces bittersweet chocolate
1/2 cup heavy whipping cream
one 8oz jar marshmallow creme


Preheat oven to 350°F. Line 12 standard muffin cups with paper liners.

Whisk graham crumbs, flour, baking powder, and pinch of salt in medium bowl. Beat butter and sugar in large bowl until light and fluffy. Add eggs 1 at a time, beating well after each addition. Add vanilla with last egg. Add graham-cracker mixture in 3 additions alternately with milk in 2 additions, beginning and ending with graham-cracker mixture.

Divide batter among muffin cups Bake cupcakes until tester inserted into center come out clean, about 22 minutes. Transfer cupcakes to rack; cool completely.

While cupcakes are baking place chocolate in medium bowl. Bring cream just to boil in small saucepan; pour over chocolate. Let stand 1 minute; stir until smooth. Cool ganache until lukewarm.

Use knife to cut holes in cupcakes. Fill with ganache and replace top. Ice with marshmallow creme, and garnish as desired.

A few notes:

I actually piped my marshmallow cream on top of the cupcakes- which turned out to be a total waste of time because it ended up oozing down the sides- but I still though it looked fine. Just know that it won't act like normal frosting would.

The ganache was so simple to make. i had no idea how easy it was. I'm going to have to experiment more with ganache fillings.

The cake, while yummy, isn't your typical cake. It was very delicate and crumbly. I still enjoyed it but thought i'd give fair warning. My cupcake corer didn't work because of the consistency- so I used a small knife.

I used a mini torch to toast the marshmallows. It was my first time using it. Any recipe where you get to use a torch earns you extra awesome points.

Wednesday, June 27, 2012

Summer Vacation

Well it's summer!! I know I've been a bit absent, and haven't managed to post much lately. I could make a bunch of excuses, or I could throw together some hurried and half-assed posts, but instead I've decided to give myself a summer vacation. Who knows, maybe I will be able to post some, but right now it hasn't been happening so I thought i'd just give official notice. Honestly I don't cook that much during the summer. Meals become super simplified, and I try to grill as much as possible. So fear not you aren't missing much. I'll see be posting to the Starting to Simmer facebook page, so "like" Starting to Simmer so you can stay up to date. See you soon- I'm gonna go make myself a margarita!

Tuesday, June 12, 2012

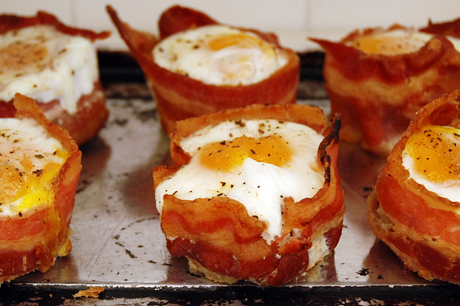
French Toast & Bacon Egg Cups

French Toast & Bacon and Egg Cups

Recipe Review- Eggs, Bacon and French Toast in one bite- what could be better? 


I really love brunch. I'm a big breakfast person but I rarely get to eat it. That's not entirely true- I eat a meal in the morning everyday. Usually its a quick egg sandwich- or lately a fruit smoothie, not really much fun. Weekend brunch makes up for all those workday on the go breakfasts. With all its choices, leisurely pace, and requisite alcoholic beverages, brunch is special occasion not to be missed.

Over memorial day weekend a friend hosted a brunch so I decided to make some egg cups that Kevin had found a recipe for. I lost the link he sent me so googled and found another great food site- 15 Spatulas which had a similar recipe. I decided to change it up and make french toast for the bottom of the egg cups. This obviously make the recipe a little more complicated but I reallyyy liked the taste.

French Toast Egg Cups
yield: 12 servings

dozen eggs
6 pieces french toast
maple syrup (optional)
12 slices bacon
salt & pepper

Place bacon on a cold baking sheet in a cool oven. Turn oven to 400 degrees and bake for 15 minutes. Bacon should be mostly cooked- but still easily pliable. Prepare a muffin pan with a light coating of non stick spray. Let bacon cool and then wrap one piece around the sides of each muffin cup.

Cook french toast using your favorite recipe, and cool. Use a round cookie cutter slightly larger than the bottom of  your muffin pan to cut the toast into circles (you will get two for each piece of bread). Push one bread circle into the bottom of the muffin cups prepped with bacon. This will help to hold the bacon in place. Drizzle maple syrup over the french toast.


Crack one egg into each bacon cup. Season with fresh ground salt and pepper. Bake in oven preheated to 400 degrees for 12 minutes- or until your eggs have set up to your liking. Let cool for 3- 5 minutes and transfer to a plate and serve.


Notes: 

I overcooked my bacon- you want it to still be flexible but mine was bordering on crispy. That made wrangling the bacon into the cupcake tins tough to do- but I made it work.  

Since I was making a full dozen egg cups I went the oven method for the bacon. If you aren't making as many feel free to make your bacon on the stove top. 

You might be able to see the cupcake liners that I put into my muffin pan. I thought this was a genius idea, and would make them easy to remove. Nope. The papers adhered to the bacon and tore when I tried to remove them. So definitely do not do that!

If you don't care for french toast- I also experimented with doing hash browns for the bottom of half of them and that was equally tasty. 

I did the beginning steps with the bacon and french toast the night before, then covered the pan in plastic wrap and threw it in the fridge. All I had to do day of was preheat the oven and crack the eggs, and then sip a Bloody Mary while they cooked. 


Monday, May 21, 2012

Brussels Sprouts with Bacon and Shallots

Recipe Review- You'll forget these are vegetables they taste so good! Even people who don't normally like Brussels sprouts will gobble these up.


We never had Brussels sprouts growing up. I'm not really sure why. Maybe because of the connotations that Brussels sprouts are not kid friendly. I've heard them described as bitter before. I'm not sure what kind of preparation said sprouts are undergoing because since trying them in my adult life I've never met a Brussels sprouts recipe that I didn't like. Steamed, stir fried, broiled or baked I find them delish- but this quick prep is a crowd pleaser. Its only has a few ingredients and steps. Sometimes simple is the best. Plus- who doesn't like bacon! I'm pretty sure that shallots and bacon can make almost anything taste better.


Brussels Sprouts with Bacon and Shallots
adapted from recipe by Rachel Ray

4 slices of bacon
1 large shallot
1.5 lbs Brussels Sprouts
Salt & Pepper
1 cup chicken broth

Place bacon on a cold pan and heat until crispy- flipping periodically. Remove from pan but do not drain grease. Coarsely chop bacon and reserve. Add Shallots to the pan and cook until light brown. Prepare Brussels sprouts by removing bottom and slicing in half. Add Brussels sprouts and season with salt & pepper. Cook for 3-4 minutes and then add in broth. Bring to a simmer, then cover and reduce heat to medium low. Cook for 10 minutes or until softened. Drain and transfer sprouts to a serving dish. Mix and bacon and additional salt and pepper if needed. Serve immediately.

printable recipe 


Thursday, May 3, 2012

Pistachio Chai Muffins


Recipe Review: Spice and Tea flavored muffins with a hint of sweet and a nutty crunch. Perfect if you don't like overly sweet breakfast pastries. 


I was reading last months Cooking Light when an article mentioned a Chai & Pistachio Breakfast muffins.  The recipe instantly went to the top of my "to make" wish list. I hate how most of the baked good breakfast options are super sweet. Don't get me wrong- I love dessert- just not first thing in the morning. These muffins are much more savory than they are sweet. The flavors were surprising, and although they are quite different from any muffin I've had before- I really liked them

Pistachio Chai Muffins

1 3/4 cups flour
1/2 cup packed brown sugar
1 teaspoon baking powder
1 teaspoon baking soda
1/4 teaspoon salt
2 chai tea bags
1 cup low-fat buttermilk
1/4 cup butter, melted
1 1/2 teaspoons vanilla extract
1 large egg, lightly beaten
1/3 cup shelled dry-roasted pistachios, chopped
1/2 cup powdered sugar
1 tablespoon water

Preheat oven to 375°.

Combine flour, brown sugar, baking powder, baking soda, and salt in a large bowl. Stir with whisk until combined. Cut open tea bags; add tea to flour mixture, stirring well. Combine buttermilk, butter, 1 teaspoon vanilla, and egg in a bowl, stirring well with a whisk. Add buttermilk mixture to flour mixture, stirring just until moist.

Place 12 muffin-cup liners in muffin cups; coat liners with cooking spray. Divide batter evenly among prepared muffin cups. Sprinkle nuts evenly over batter. Bake at 375° for 15 minutes or until a wooden pick inserted in center comes out clean. Cool for 5 minutes in pan on a wire rack.

Combine remaining 1/2 teaspoon vanilla, powdered sugar, and 1 tablespoon water, stirring until smooth. Drizzle glaze over muffins.

printable link


If you follow this blog you might have noticed that I haven't had a post in quite a while. April was a whirl wind. I took a trip to LA with my sister over Easter, and also started working a part time job. Things have settled down a little bit and I'm getting into a new routine. Hopefully now that I've adjusted I'll be able to fit blogging in more easily. I really have missed it! New advances since I've updated is I am now a pinterest addict (who isn't) So if you'd like to follow me you can find me here!

Thursday, April 12, 2012

Balsamic Pork Loin


Lately I've been getting very into economical cooking. Over the past few years I've loved trying out new recipes and exotic dishes just for fun, but unfortunately that's not really in my current weeknight meal budget. My new challenge for myself- rather then seeing what fancy new dish I can create, is to shop smart and make something tasty for less dough.

This has been going relativity well. I've been shopping the sales and cooking in bulk to cut down on both the expense and the kitchen time. I've been freezing things and then defrosting later. This seems to work really well with Chili, and also Chicken Tortilla soup. Kevin and I make pork tenderloin all the time, but I notice that pork loin was much cheaper. I had never cooked a pork loin before but I figured I'd give it a whirl! This turned out really really good. It has a long cook like but very little hands on time. The piece of meat was too big for us to finish (the photo is just half of it!) So I marinated and froze the other half.

Balsamic Pork Loin
serves 4


1 Boneless pork loin (2.5 lbs)
1/2 cup olive oil
1/2 cup balsamic vinegar
1/8 cup minced garlic
salt and pepper
rosemary
ground fennel

First prep your meat with a generous coating of fresh ground salt & pepper. Sprinkle on rosemary ground fennel. Firmly press the spices into the meat with your hands, making sure all sides are covered. In a large plastic bag combine olive oil, vinegar, and garlic. Add pork to the bag. Squeeze out any air and make the marinade is evenly distributed. Marinate overnight.

Preheat oven to 450 degrees. Bake for 15 minutes, then reduce temperate and bake for an additional 1.5 hours. Check with a meat thermometer to make sure internal temperature has risen to 145 degrees. Allow to rest for 10 minutes before slicing.

printable recipe


When you're preparing don't be shy with the spices! Grind on lots for salt and pepper and add in any other herbs you enjoy. If you remember to flip the pork over in the morning so that the marinade isn't just soaking on the bottom half. I served this with baked sweet potatoes and sauteed zucchini.

Tuesday, March 27, 2012

Blood Orange Mimosa Cupcakes

Recipe Review: The prefect brunch cupcake! You'll have some leftover champagne so pour a glass and enjoy with your cupcake!

Last year I made my good friend Amber champagne cupcakes for her birthday. This year I took it one step further and made blood orange mimosa cupcakes. They use the champagne cake and buttercream recipes that I followed last year- along with a blood orange filling, and candied blood oranges for garnish.


Champagne Cupcakes
yield: 15 cupcakes
1/2 cup butter, softened
1 cup sugar
2 eggs
1 tsp vanilla
1 3/4 cups flour
1/2 tsp baking soda
1/4 tsp baking powder
1/4 tsp salt
1/2 cup sour cream
1/2 cup champagne

Preheat oven to 350 degrees.  In a bowl cream together butter and sugar with an electric mixer (or in bowl of stand mixer fitted with paddle attachment) until light and fluffy. Add eggs one at a time beating well after each addition.  Add vanilla and mix. 

In a medium sized bowl mix together flour, baking soda, baking powder and salt, set aside. In a separate bowl whisk together champagne and sour cream (mixture will fizz and bubble). Add flour 1/3 at a time, alternating with champagne and sour cream mixture. 

Fill cupcake liners with level 1/4 cup of batter. Bake for 17-20 minutes until tops are just beginning to brown. Cool completely before frosting.


Champagne Buttercream Frosting

1 cup champagne plus one tablespoon
1 cup butter softened
2 1/2 cups confectioners sugar

Place 1 cup of champagne in a small saucepan, and simmer over medium high heat until it has reduced to 2 tablespoons. Remove from heat and allow to cool. 

Cream softened butter. Add confectioners sugar in three batches, using a medium high speed. Add in reduced champagne and additional tablespoon champagne and mix well.


Blood Orange Filling

1.5 cups chopped blood oranges, with pith removed
1/4 cup blood orange juice
1/2 cup sugar
1/4 cup water
2 tbsp corn syrup

Add orange pieces, sugar and orange juice to a saucepan. Cook on medium low for 5-10 minutes until a syrupy mixture forms. 

Mix corn syrup and water together with a fork or small whisk to make a slurry. Add to the pan, and stir constantly for 5-10 minutes. The mixture will go from opaque to translucent and thicken considerably. When the mixture is thick and goopy, remove from head and allow to cool to room temperature. The mixture will continue to thicken as it cools. Can be made ahead and refrigerated overnight, if desired.


    Sugared Orange Slices

    2 oranges sliced thin
    2 cups sugar
    1 cup water

    Bring a pot with 2 cups of water to a rolling boil. Thinly slice lemons, add to water and blanch for 5 minutes. Drain lemons and place in a cold water bath.
    Add sugar and water to pan and stir until sugar dissolves completely. Add lemons to sugar water and bring to a gentle boil. Reduce heat to a low simmer, and cook for 1 hour.
    Spray a cooling rack with non stick spray. Transfer lemons to rack to set for 24 hours. 

    A few notes- 

    I added a little bit of the filling to the frosting to turn it light pink, then piped it own using a IM wilton tip. I also melted some filling and drizzled it on top. The pictures don't really show it that well but there is also edible disco dust glitter that I got at a local baking supply store- Do it with Icing.  I used these adorable baking cups from bake it pretty that I picked up last year but haven't really known what to do with. I really liked the look and think I'm going to have to use more baking cups like these in the future!


    The birthday was great. We took the ferry to Coronado Island and had lunch then walked around a little. The day started out clear- (see pic above) but then got rainy towards the end of the afternoon. It worked out perfectly for me as I sometimes secretly enjoy rainy afternoons and curling up with a cup of tea and a book. I'm currently re reading Hunger Games after seeing the movie reminded me how much I loved the books.

    Sunday, March 18, 2012

    Rave Review: Bob's Red Mill Gluten Free Baking Mix


    Gluten Free baking is still a pretty scary thing for me. Luckily I don't have to do it that often, but last week I was going to a dinner where the hostess is gluten intolerant. I didn't want to bring something to her house that she couldn't eat (that seemed like a faux pas) so I turned to Bob's Red Mill.

    I used the recipe on the back of the bag for cheddar rosemary biscuits, (which I can't type up here because I tossed the bag without thinking) except left out the cheddar and threw in some extra rosemary. The kitchen filled up with this incredible rosemary smell while it was baking. These took only about 10 minute of prep time, and most of the heavy lifting was done by my Kitchenaid. Everyone loved the biscuits. They went great with our mixed green salad and salmon. Kudos to Bobs Red Mill for making a tasty, easy to whip up gluten free mix.

    I have to say- a dinner party can be stressful but we did a great job of diving up duties so that no one was overwhelmed. The hostess made the main dish, then the rest of us brought the sides. Easy!


    Friday, March 2, 2012

    Thin Mint Chocolate Cupcakes

    Warning- these are super duper chocolatey- so if you go into a heavenly chocolate mint coma after eating one, don't blame me. You were warned. 


     The thin mint themed recipes continue with thin mint cupcakes! You know I couldn't resist this one right?? The breakdown of what we have here is, chocolate and mint frosting, on a chocolate cupcake. I used some left over thin mint truffles and popped them in the batter- but honestly that didn't work that great. The fudge was a little too dense. If you want a surprise in the cupcakes I would suggest putting a whole cookie at the bottom of each cupcake before pouring the batter in. That's what I'm gonna do next time! If you can't get your hands on the cookies this will still replicate their classic chocolate mint flavor.

    For the base I used my standby Martha one bowl chocolate cake recipe. Its an easy recipe with constant results, but what really makes it is the frosting. Also I've noticed that with this particular recipe the cake is yum day of, but the quality declines rapidly after. This is a great recipe to use for cake pops since its simple and only uses one bowl.

    Thin Mint Cupcakes
    adapted from- Martha Stewart
    yield- 18 to 24 cupcakes

    3/4 cup unsweetened cocoa powder
    1/ 1/2 cups all purpose flour
    1 1/2 cups sugar
    1 1/2 teaspoons baking soda
    3/4 teaspoon baking powder
    3/4 teaspoon salt
    2 large eggs
    3/4 cup warm water
    3/4 cup buttermilk
    3 tablespoons vegetable oil
    1 teaspoon vanilla extract
    24 thin mint cookies


    Preheat oven to 350 degrees. Line pan with cupcake papers and place a cookie in each one.

    Sift together cocoa powder, flour, sugar baking soda, baking powder, and salt into a large bowl. Add eggs, warm water, buttermilk & vinegar mixture, oil and vanilla to bowl and mix well until smooth, about 3 minutes. Scrape down the bottom of the bowl to ensure batter is well mixed.

    Pour batter into muffin cups, over cookies, filling 2/3rds full. Bake until the tops spring back when pressed lightly, about 20 minutes. Transfer to a wire rack and let cool completely before frosting.


    Chocolate Mint Frosting
    yield- enough for 24 cupcakes. 


    adapted from: allrecipies.com
    yield: enough frosting for 2 dozen cupcakes

    1/2 cup butter
    4 oz unsweetened chocolate
    4 cups powdered sugar
    1 teaspoon vanilla extract
    1/2 cup milk
    1 tsp peppermint extract

    Melt chocolate and butter in the microwave, or in the top of a double boiler. In a large bowl combine sugar vanilla and 1/2 of the milk. Blend in the chocolate mixture. Whip on medium high setting of mixer with whisk attachment. Add peppermint and remaining milk a little at a time until desired consistency is achieved.


    The best part about this frosting is that you can make it as minty as you want. Be careful. Peppermint extract is really strong. I only used a small amount in because I really wanted the taste to be mostly chocolate with a hint of mint.


    In other news... Kevin finished my thin mints. Yep. I woke up last week to find the empty sleeve sitting on the kitchen counter. He claims that he had low blood sugar in the middle of the night and they were the only thing we had. Hummph. While I guess that is sort of a pretty good excuse for eating the last 4 thin mints it still sucks. I still haven't had a chance to make thin mint brownies, so I guess those girl scouts are gonna be getting more of my money.

    Tuesday, February 28, 2012

    Sweet Potato Garlic Knots

    Recipe Review: The sweet potato adds a unique flavor to these easy to make garlic knots.

    After the success of my valentines day pretzel experiment I've suddenly found myself unafraid of making my own bread. The yeast and the rising and the kneading all sounded too many possible steps that I might flub. Now it just seems silly that I waited so long. Attach the dough hook to your KitchenAid and no kneading is necessary. Perfect dough just forms before your eyes. I've always wanted to make my own garlic knots, so they became my next project. A quick tastespotting search led me to a variety using sweet potatoes- yum!


    Sweet Potato Garlic Knots
    adapted from: kholercreated.com
    yield: 16 rolls

    1 cup warm water
    1 envelope active dry yeast
    2 tablespoons agave nectar
    1/2 cup sweet potato puree
    2 tablespoons olive oil
    1 1/2 teaspoons salt
    3 1/2 cups flour
    6 cloves minced garlic
    1/8 cup olive oil

    To make sweet potato puree: Wash and peel sweet potato and cut into 1 inch squares. Place in a large pot of boiling water and cook for 20-25 minutes, or until fork tender. Remove from heat, drain, and return to pot. Beat with hand mixer until smooth.

    Pour warm water into the bowl of your stand mixer and add yeast. Let sit for 10 minutes, then add in honey, olive oil and sweet potato puree. Mix until well combined.

    Attach dough hook to mixer. On lowest setting add flour and salt very slowly. Continue to mix until dough forms, about 5 minutes. Remove dough, rinse and dry bowl. Use olive oil to generously oil the inside of the bowl. Return dough to bowl and roll to coat with the olive oil. Place in a warm area, cover with saran wrap and allow dough to rise for at least one hour, until it has doubled in size.

    Preheat oven to 425 degrees. Divide dough into 16 equal pieces. On a floured surface roll them into 8 inch strips and tie into knots, tucking ends under each knot. Bake for 12-14 minutes, until golden. While rolls are baking mince garlic and combine with olive oil. Brush a generous coating onto rolls immediately after removing from oven. Lightly salt rolls with fresh ground sea salt. Allow to cool for 3-5 minutes before serving.

    printable recipe


    These were really yummy. Nothing beats fresh bread out of the oven. Spread them with some herbed butter and they are heaven. I can't wait for the fall when I can try this out using pumpkin puree. I brought these to a housewarming potluck, and I was surprised how quickly they disappeared. I want to experiment with making the dough in advance and then either freezing or refrigerating the knots. How awesome would it be to have them all ready and just pop them in the oven?

    Last weekend out fridge broke down so we found ourselves frantically calling people on craigslist and ended up with a huge chest freezer for only 40 bucks! I'm actually excited because now we can really make the most of our costco membership. Also I now will have the opportunity to do things like cooking huge batches of chili and freezing it, or buying sale turkey's after thanksgiving. So if you know if any freezer friendly recipes, or tips or maximizing the freezer let me know!

    Monday, February 20, 2012

    Whole Wheat Soft Pretzels

    Review: It looks like a pretzel, it tastes like a pretzel, and its not that hard to make!


    disclaimer before we start: That pretzel picture is pretty lame. They tasted good though. I'm sure I'll be making them again so hopefully I will eventually update this post with better pics.


    A KitchenAid Mixer will change your life. For reals. A year ago I had never baked from scratch before. I was a box cake mix girl. As you might have noticed I now am completely obsessed with baking from scratch, most often its cupcakes, but its pretty much always dessert. As I pulled home made soft pretzels out of the oven it really hit me how much I've changed. A year ago pretzels were something that you bought- not something that you made. It really is all because of the KitchenAid that I got for Christmas 2010. I don't think I would have ever attempted all the different recipes I've made without it. I use it at least once a week now and it has become an essential part of my kitchen.

    Anyways back to the Pretzels. Kevin and I decided on doing a low key Valentine's day, dinner at a local restaurant (nothing too fancy) and we decided to forgo the gifts. I couldn't just not do anything for him though, since he was taking me to dinner. Also I really love celebrating holidays, and love giving creative gifts. Kevin has a bit of a soft pretzel addiction, so I decided that I would make him some homemade ones.

    Soft Pretzels
    adapted from Alton Brown
    yield: 8 pretzels

    1 1/2 cups warm water
    1 tablespoon sugar
    2 teaspoons kosher salt
    1 package active dry yeast
    11 oz of whole wheat flour
    11 oz of all purpose flour
    2 oz of butter melted
    vegetable oil, for pan
    10 cups water
    2/3 cup baking soda
    1 large egg yolk beaten with 1 tbsp water
    sea salt

    Combine the water, sugar and salt in the bowl of a stand mixed and sprinkle the yeast on top. Allow to sit for 5 minutes or until the mixture begins of foam. Add the flour and the butter. Using the dough hook attachment, mix on low speed until well combined. Change to medium speed and knead until the dough is smooth and pulls away from the side of the bowl. Removed the dough from the bowl, clean the bowl and then oil it. Remove the dough to the bowl, cover with plastic wrap and let sit in a warm place for approximately 1 hour, or until the dough has doubled in size.

    Preheat the oven to 450 degrees. Line two baking sheets with parchment paper and coat with non stick spray.

    Bring the 10 cups of water and the baking soda to a rolling boil in a 8 quart saucepan.

    In the mean time turn the dough out onto a slightly oiled work surface and divide into 8 equal pieces. Roll out each piece into a 20 inch rope. Twist into your favorite shape. For a classic pretzel make a U shape, cross the ends twice and then fold in half, pressing the ends into the bottom of the U.

    Boil the pretzels one at a time for 30 seconds each. Remove from water and place on baking sheets. Brush with egg yolk and sprinkle with alt. Bake until golden brown, approximately 12-14 minutes. Let cool and enjoy.

    Pretzel making diagram via tomatoesontomatoes.com


     printable recipe with diagram


    These were super yum! The original recipe didn't use wheat flour but I like to up the nutrition content and I had both flours on hand. These were super yum and they tasted like pretzels. (Ok so I know that's sort of a weird thing to say, but sometimes you make homemade things and they don't taste like their store bought counterparts. This did.) Kevin is now requesting that we use the pretzel dough to make mini pretzel pizzas. I don't see why that wouldn't work. I also want to make pretzel pigs in a blanket using small pieces of sausage and pretzel dough. I need to win the lottery so I can stay home all day and try new recipes. That would be heaven.

    Thursday, February 16, 2012

    Thin Mint Truffles

    Recipe: Decadent Dark Chocolate and Mint truffles that are a cinch to make!


    Welcome to part one of my Thin Mint themed baking experiments. I'm not really sure how many follow ups there will be, but I'm already thinking of some thin mint cupcakes and brownies. Lets start off easy though with some no bake Thin Mint truffles.


    These yummy treats are very similar to cake balls, but instead are made with cookies, so they are actually even simpler, and don't require your oven. I think that thin mints are perfect for this- but you can use Oreo's too. If it's not Girl Scout Cookie season, you can find Keebler grasshopper cookies year round .  

    (Ummm hey Girl Scouts this box of cookies is a whole lot smaller than when I used to sell them, yet the price is the same. not so cool.)

    Thin Mint Truffles
    makes about 3 dozen

    2 packages of thin mints
    8oz cream cheese, softened
    1 bag of dark chocolate melts

    Dump cookies into food processor and pulse into fine crumbs. In a large bowl combine crumbs and softened cream cheese and mix until thoroughly combined. Roll into small balls and refrigerate for 15- 20 minutes.

    According to package directions melt chocolate. Dip cookie balls into chocolate, transfer to a baking sheet lined with wax paper, and allow to set. If desired sprinkle any decorations on before chocolate hardens. Store in fridge for up to a week and enjoy!

    printable recipe


    These are seriously easy to make if you just master the dip technique. (Which admittedly took me quite a while.) I use a toothpick to dip, and then blob a little more chocolate on top to cover the hole. Sprinkles and other decorations make things cute and cover mistakes and imperfections. Another tip is you should try not to burn your first batch of chocolate. I microwaved on high rather than 50%. Super Fail.

    Sidebar: It has always bothered me that truffles means both chocolate and delicious fungus. Truffle french fries and cheese are ah-ma-zing, but would be considerably less so had they been drizzled in chocolate. Turns out the chocolates are named after the fungus (can we classify it as something else? the word fungus grosses me out) because they look similar. Truffles from the ground look sorta like little chocolate lumps. 

    Monday, February 6, 2012

    Valentine's Day Cake Pops

    Recipe Review: Sweet treats to get ready for Valentines Day! They taste as good as they look!


    I have FINALLY figured out how to dip cake pops! I've had so much trouble before. Leave it to Bakerella- the cake pop guru to make a video so it suddenly seems so simple! Turns out I never melted enough chocolate and so I was having to twist the pops all over the place and that's why it wasn't working.


    I had a cupcake job this weekend and had some leftover batter. I decided to tint it pink and purple and make some cake pops for valentines day! Cake pops are awesome because you can make them a few days in advance and they stay fresh and yummy. Now that I had mastered the cake pop dip, it was time to decorate. I bought conversation hearts but only a few of them actually looked good, and most of the phrases have been updated to things like "text me" and "tweet me" yuck. What happened to "Be Mine"?? I ended up crushing the heats with a rolling pin and sprinkling them onto the pops. Cute!!!


    I've updated my cake pop instructions with hints that I've learned along the way.

    Here we go!

    1. Bake a normal sheet cake and crumble into a bowl. I like to cut off any hard corners or brown edges.

    2. Add frosting. I use about 1 cup for an entire 9 x13 cake. Mix well so that frosting is evenly distributed. Its better to add it a little at a time if you are unsure about how much to add. At this point the mixture should be moist but not heavy and you should be able to easily roll into balls.

    3. Roll cake/frosting mix into 1 inch balls, pop them in the fridge for 15-20 minutes. (I have even left them overnight)

    4. Melt your chocolate or candy melts according to the directions on packaging.  I like to use a glass measuring cup rather than a bowl because the depth is good for dipping.

    5. Press a lollipop stick about halfway through the cake ball. Remove and dip into melted chocolate then reinsert. Place upside down on baking sheet. Once you have dipped all the sticks place in fridge for 5 minutes

    6. Dip entire cake ball straight down into melted chocolate. Rock slightly if needed to make sure whole surface is covered but do not twist. Remove from chocolate and gently tap sides while rotating to let any extra chocolate drip off.

    7. Sprinkle with any decorations if desired, and carefully place into styrofoam or floral foam to dry.


    Only one week till Valentine's Day! Now that I've got the treats and blogging done I should probably figure out what to get Kevin!


    P.S. I'm pretty proud of myself for actually doing this ahead of the holiday rather than after. The only downside is that I doubt these will last until Valentine's Day so I'm sure I'll end up baking something else this weekend.


    Tuesday, January 31, 2012

    Mexican Chocolate Pecan Bars

    Review: Nutty, Chocolaty, Salty and Sweet these bars are a hit!


    I first tried Mexican hot chocolate at a little place in Ocean Beach called Ortega's. Its just like regular hot chocolate but with delicious spices that give it a much more complex flavor. Rather then coming in a powder, it starts in chocolate blocks that you melt with milk on the stove. When I needed a dessert to make for a Mexican themed pot luck at Kevin's office I knew I wanted to do something with Mexican Chocolate. Internet searching helped me find a Rick Bayless recipe for Mexican Chocolate Pecan Pie Bars. I'm a big fan of everything Rick Bayless so obviously I had make them.


    Chocolate Pecan Pie Bars
    yield: 32 2-inch bars
    source: RickBayless.com

    9 ounces (about 2 cups) pecan halves
    One 9-ounce bag pretzel rods
    4 sticks unsalted butter (divided use)
    1/2 cup sugar
    8 ounces semisweet or bittersweet chocolate, chopped into pieces not larger than 1/4-inch
    4.5 oz finely chopped Mexican chocolate
    3 tablespoons flour
    6 large eggs
    1 1/2 cups firmly packed brown sugar
    1 1/2 cups dark corn syrup
    1 tablespoon pure vanilla extract

    Toast the pecans and prepare the crumb crust. In a 325 degree oven, toast the pecans on a rimmed baking sheet until noticeably darker and toasty smelling, about 10 minutes. Let the pecans cool to lukewarm (but keep the oven heated), then coarsely chop them by hand into1/4 to 1/2-inch pieces. Scrape into a large bowl. Use a food processor to chop the pretzels into fairly fine crumbs. (You should have 2 cups of crumbs.) In a small saucepan over medium heat or in a microwave at 50% power, melt 2 sticks of the butter. Scrape into the processor, along with the 1/2 cup sugar. Pulse until everything is combined. Butter the bottom and sides of two 8 x 8-inch baking pans. Cut a piece of parchment to fit the bottom of each pan, then press them firmly in place. Butter the parchment paper. Divide the crumb mixture between the two pans and pat into an even layer covering the bottom completely.

    Make the filling. To the pecans, add the 2 chocolates and the flour. Stir to combine, then divide evenly between the 2 pans. In your small saucepan or microwave, melt the remaining 2 sticks of the butter. In the bowl of an electric mixer, combine the eggs, brown sugar, corn syrup and vanilla, and beat at medium-low speed (if your mixer has a choice, use the flat beater). Slowly add the melted butter, mixing until the batter looks smooth. Divide the batter between the two pans, pouring it slowly and evenly over the surface to ensure even distribution of the chocolate and pecans through the batter.

    Slide into the oven and bake for 45 to 55 minutes, until the center has just set. Let cool to room temperature. Cover and refrigerate until firm for easy cutting. Cut into 2-inch squares. Keep them stored in the refrigerator until just before serving.


    original recipe link

    I made a major mistake in putting these into cupcake papers. I thought that it would make it easier so I wouldn't have to cut up the bars. WRONG! It was awful, the papers stuck, and shredded when I tried to take them off, so finally I resorted to cutting them off, which unfortunately meant lots of wasted yumminess. Oh well- next time I'll make them in one large pan and cut them into bars.

    The final product went over really well at the work pot luck. They didn't get touched till right at the end, but once one person tried them they got rave reviews and everyone started trying them and loved them! Actually two people asked Kevin if he had more at home that he could bring in the next day. The taste is so perfect, salty, and sweet and nutty. The taste of the Mexican Chocolate is subtle and comes out right at the end. Next time I think I'll add more of the Mexican Chocolate and less of the semi sweet. I still have a few blocks of the Mexican Chocolate left, and while I know I'll be using some of it to make hot chocolate, I'm not sure what to use the rest for. If you have any suggestions let me know!

    Wednesday, January 18, 2012

    Flower Pot Cupcakes

    Recipe Review: Too cute! Almost look too good to eat- but they taste just as yummy as they look!

    Last fall when I got hooked on making cupcake toppers I had visions of these cupcakes. I made the toppers, in early October, but then all the theme holidays kicked in, and there really weren't occasions where these toppers would work, plus it seemed silly to make them in the winter. Finally things calmed down and it was my friend Amanda's birthday. And oh well its not spring yet, but I was making those flower pot cupcakes!!


    Basically these were incredibly easy, I made chocolate cupcakes, and then used a grass tip to pipe green frosting on top. After the frosting set I popped them into two inch terra cotta pots, and stuck a flower topper in each one. They turned out just as cute as I had hoped and I had a blast photographing them in our backyard.

    Making the toppers wasn't hard, I glued paper flowers to a bamboo stick, and then used a half pearl in the centers. I got all the supplies at Michaels. If you want to save yourself some time I made an extra set and they are will be for sale on my esty site. (sometime soon I hope... I'm a little behind on that)


    Just in case you need it here is a simple one bowl chocolate cake recipe:

    One Bowl Chocolate Cupcakes
     yield: 24 cupcakes
    from: Martha Stewart

    3/4 cup unsweetened cocoa powder
    1 1/2 cups all purpose flower
    1 1/2 cups sugar
    1 1/2 teaspoons baking soda
    3/4 teaspoon baking powder
    1/2 teaspoon salt
    2 large eggs at room temperature
    3/4 cup warm water
    3/4 cup whole milk
    1 tablespoon vinegar
    2 tablespoons sour cream
    3 tablespoons safflower oil
    1 teaspoon vanilla extract

    Preheat over to 350 degrees. Line muffin tins with paper liners.

    Sift together cocoa powder, flour, sugar baking soda, baking powder, and salt into a large bowl. Combine milk and vinegar and let sit for 5 minutes. Add eggs, warm water, milk & vinegar mixture, sour cream, oil and vanilla to bowl and mix well until smooth, about 3 minutes. Scrape down the bottom of the bowl to ensure batter is well mixed.

    Pour batter into muffin cups, filling 2/3rds full. Bake until the tops spring back when pressed lightly, about 20 minutes. Transfer to a wire rack and let cool completely before frosting.

    printable recipe


    Monday, January 9, 2012

    Mussels in White Wine with Saffron

    Recipe Review- Perfect for a romantic dinner or a small get together- Mussels are an easy way to make a sumptuous meal that is sure to impress!


    Before meeting Kevin I had always thought of mussels as an ingredient. I had them before in chowders, seafood soups and the like, but never as a main dish. Early on in our dating while we were at the Blind Lady Alehouse Kevin ordered us some mussels. I was perplexed. "Just a plate of mussels?" I thought. Then they arrived, and we ate them, soaking up the broth with french fries, and I was hooked.

    Last weekend my friend Amber came over, and she suggested that we made mussels for dinner. I couldn't believe how simple it was- and affordable too. The Mussels were only 3.99 a lb at Whole Foods! We ate them with some crusty french bread and a Gorgonzola and pear salad on mixed greens. It was a great dinner and cooking at home (glass of wine in hand) was the perfect way to end a busy week and relax. Now that I know how simple it is I'm excited to make mussels at home more often. It feels like a fancy indulgent dinner, but its really not.


    Mussels in White Wine with Saffron
    adapted from Barefoot Contessa
    serves 4

    3 lbs mussels
    1/3 cup all-purpose flour
    2 tablespoons unsalted butter
    2 tablespoons olive oil
    1 cup chopped shallots
    2 tablespoons chopped garlic
    1/2 cup chopped canned tomatoes, drained
    1/2 teaspoon saffron threads
    1/3 cup chopped flat leaf parsley
    1 tablespoon fresh thyme leaves
    1 cup white wine
    2 teaspoons kosher salt
    1 teaspoon freshly ground black pepper
    Clean the mussels, by putting them in a large bowl with 2 quarts water and the flour and soak for 30 minutes (This removes any sand). Drain the mussels, then removed the "beard" with your fingers. If needed scrub the mussels with a brush under running water. Be sure to discard any mussels with shells that are not tightly shut.

    In a large stock pot heat the butter and olive oil over medium head. Add the shallots an cook for 5 minutes. Add the Garlic and cook 3 more minutes or until the shallots are translucent. Add the tomatoes, saffron, parsley, thyme, wine salt and pepper and bring to a boil.

    Add the mussels, stir well, then cover the pot, and cook over medium for 8-10 minutes. With lid on shake pot once or twice during cooking to be sure mussels do not burn on the bottom. Once all mussels are opened pour into a large bowl with sauce and serve. Discard any mussels that do not open.

    printable recipe