Thursday, February 14, 2013

Rave Review: Trader Joe's Thai Green Curry Simmer Sauce

Rave Review: Yum x 2

This weekend my girlfriends and I ran away to a cabin for a ski get away. Well I guess it's technically not a ski get away if you don't go skiing. Details. My friend Amber who is an amazing chef cooked us some great meals. On our second night she used Trader Joe's Thai Green Curry simmer sauce to make a great vegetarian curry. I couldn't stop thinking about how easy it whipped up, and how great the sauce tasted! So I ran out to the store and grabbed some for a wednesday night dinner.   I feel that i'm usually let down by pre made sauces, but this one was different! It's creamy and flavorfully with quite a kick! (It's downright spicy so if you like mild this isn't for you) 

source: www.smitaphotoblog.com
I used a container of Asian Stir Fry Vegetable mix (also from Trader Joe's). It had red and green peppers, baby corn, water chestnuts, mushrooms, red and white onions, snow peas, and carrotts. I also chopped up some zucchini and threw that in there. I sauteed all the veggies with a little olive oil in a large frying pan for about 7 minutes before adding in the simmer sauce and cooking for an additional 10 minutes. I served this over quinoa because that's what I had, but I preferred it over brown rice.  I'm really excited to have a new quick, healthy weeknight meal to add to my regular go to's!

Side note: On our trip Amber surprised us with the most amazing wine sippy cups!! Such and awesome gift. I totally know what I'm bringing to the office gift swap next Christmas!! They come in all sorts of colors and you can buy them at http://store.theproductfarm.com. You can complain about being snowed in if you have wine in Sippy Cups!




Thursday, January 24, 2013

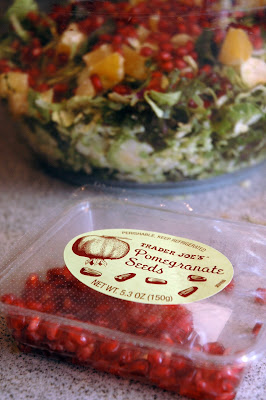
Kale & Pomegranate Salad

Recipe: Crunchy Kale salad with Pomegranate Seeds

Errr. So it's been a while. I'll recap real quick. Started a new job. My sister moved to LA. My dad came to visit for a week. My friend had a baby. We hosted potluck thanksgiving. I went home for Christmas. Celebrated the new year over Sushi. 

Now you're caught up and i'm nearing the end of a new years cleanse. 28 days with no caffeine, alcohol, dairy, gluten, or added sugars. If you're interested in the details you can find them here. One of my favorite new recipes that I've tried on the cleanse is this kale salad. I've been making up a big batch and taking it to work for lunches. Its crunchy and filling. The fruit brightens everything up, and the nuts add a savory note.


Kale & Pomegranate Salad
serves 4
1 large head of Kale
Brussels sprouts
1/2 cup chopped walnuts
1 package pomegranate seeds (5.3 oz)
2 oranges peeled and sectioned.

Rinse Kale and Brussels sprouts and shred finely. (I would highly recommend doing this in a food processor if you have the option) Toast the nuts in a dry pan over medium heat until they are fragrant.  Combine nuts, pomegranate seeds, and oranges and kale mixture and toss with your favorite vinaigrette. Here are some ideas if you'd like to make your own. I used olive oil, white balsamic vinegar, dijon mustard, salt, and pepper. This can be served immediately, but will keep for up to a week in the fridge. 


The cleanse is almost over. It's gone really well and it feels good to start the new year in a healthy way. Don't worry I'm sure there will be lots of yummy baked treats that I'll blog about, but i'm hoping some of the healthy eating from this month sticks with me in 2013.

Monday, September 10, 2012

S'mores Cupcakes

Crumbly graham cracker cake filled with chocolate ganache and topped with gooey marshmallow creme. 


I know its been a while but i'm back! Summer was so nice. There were lots of trips to the beach, my family came to visit and I started a new job that I'm really enjoying. There wasn't much baking, and most cooking project involved simple grilling so you didn't miss much.

I had told the people at my new job that I liked to bake. During my second week there was a bake sale to raise money for charity so it was the perfect opportunity to show off my skills. I decided I wanted to make something summery- so I had the idea of s'mores. I dare you to try to find someone who dislikes s'mores. They don't exist. Everyone loves them and eating them brings back memories of childhood summers. Luckily Bon Appetit had test driven this recipe for me so I only had to make a few adaptions.

S'mores Cupcakes
adapted from Bon Appetit
makes 12 cupcakes

Ingredients
1 1/2 cup graham cracker crumbs (about 15 whole crackers)
1/2 cup all purpose flour
2 1/2 teaspoons baking powder
1/2 cup unsalted butter, room temperature
3/4 cups sugar
2 large eggs
1 teaspoon vanilla extract
3/4 cup whole milk
8 ounces bittersweet chocolate
1/2 cup heavy whipping cream
one 8oz jar marshmallow creme


Preheat oven to 350°F. Line 12 standard muffin cups with paper liners.

Whisk graham crumbs, flour, baking powder, and pinch of salt in medium bowl. Beat butter and sugar in large bowl until light and fluffy. Add eggs 1 at a time, beating well after each addition. Add vanilla with last egg. Add graham-cracker mixture in 3 additions alternately with milk in 2 additions, beginning and ending with graham-cracker mixture.

Divide batter among muffin cups Bake cupcakes until tester inserted into center come out clean, about 22 minutes. Transfer cupcakes to rack; cool completely.

While cupcakes are baking place chocolate in medium bowl. Bring cream just to boil in small saucepan; pour over chocolate. Let stand 1 minute; stir until smooth. Cool ganache until lukewarm.

Use knife to cut holes in cupcakes. Fill with ganache and replace top. Ice with marshmallow creme, and garnish as desired.

A few notes:

I actually piped my marshmallow cream on top of the cupcakes- which turned out to be a total waste of time because it ended up oozing down the sides- but I still though it looked fine. Just know that it won't act like normal frosting would.

The ganache was so simple to make. i had no idea how easy it was. I'm going to have to experiment more with ganache fillings.

The cake, while yummy, isn't your typical cake. It was very delicate and crumbly. I still enjoyed it but thought i'd give fair warning. My cupcake corer didn't work because of the consistency- so I used a small knife.

I used a mini torch to toast the marshmallows. It was my first time using it. Any recipe where you get to use a torch earns you extra awesome points.

Wednesday, June 27, 2012

Summer Vacation

Well it's summer!! I know I've been a bit absent, and haven't managed to post much lately. I could make a bunch of excuses, or I could throw together some hurried and half-assed posts, but instead I've decided to give myself a summer vacation. Who knows, maybe I will be able to post some, but right now it hasn't been happening so I thought i'd just give official notice. Honestly I don't cook that much during the summer. Meals become super simplified, and I try to grill as much as possible. So fear not you aren't missing much. I'll see be posting to the Starting to Simmer facebook page, so "like" Starting to Simmer so you can stay up to date. See you soon- I'm gonna go make myself a margarita!

Tuesday, June 12, 2012

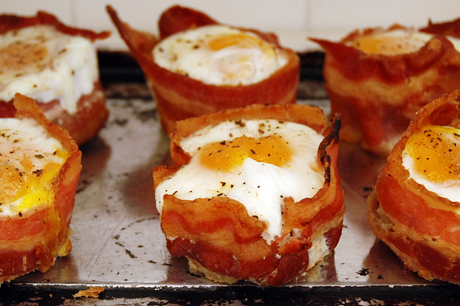
French Toast & Bacon Egg Cups

French Toast & Bacon and Egg Cups

Recipe Review- Eggs, Bacon and French Toast in one bite- what could be better? 


I really love brunch. I'm a big breakfast person but I rarely get to eat it. That's not entirely true- I eat a meal in the morning everyday. Usually its a quick egg sandwich- or lately a fruit smoothie, not really much fun. Weekend brunch makes up for all those workday on the go breakfasts. With all its choices, leisurely pace, and requisite alcoholic beverages, brunch is special occasion not to be missed.

Over memorial day weekend a friend hosted a brunch so I decided to make some egg cups that Kevin had found a recipe for. I lost the link he sent me so googled and found another great food site- 15 Spatulas which had a similar recipe. I decided to change it up and make french toast for the bottom of the egg cups. This obviously make the recipe a little more complicated but I reallyyy liked the taste.

French Toast Egg Cups
yield: 12 servings

dozen eggs
6 pieces french toast
maple syrup (optional)
12 slices bacon
salt & pepper

Place bacon on a cold baking sheet in a cool oven. Turn oven to 400 degrees and bake for 15 minutes. Bacon should be mostly cooked- but still easily pliable. Prepare a muffin pan with a light coating of non stick spray. Let bacon cool and then wrap one piece around the sides of each muffin cup.

Cook french toast using your favorite recipe, and cool. Use a round cookie cutter slightly larger than the bottom of  your muffin pan to cut the toast into circles (you will get two for each piece of bread). Push one bread circle into the bottom of the muffin cups prepped with bacon. This will help to hold the bacon in place. Drizzle maple syrup over the french toast.


Crack one egg into each bacon cup. Season with fresh ground salt and pepper. Bake in oven preheated to 400 degrees for 12 minutes- or until your eggs have set up to your liking. Let cool for 3- 5 minutes and transfer to a plate and serve.


Notes: 

I overcooked my bacon- you want it to still be flexible but mine was bordering on crispy. That made wrangling the bacon into the cupcake tins tough to do- but I made it work.  

Since I was making a full dozen egg cups I went the oven method for the bacon. If you aren't making as many feel free to make your bacon on the stove top. 

You might be able to see the cupcake liners that I put into my muffin pan. I thought this was a genius idea, and would make them easy to remove. Nope. The papers adhered to the bacon and tore when I tried to remove them. So definitely do not do that!

If you don't care for french toast- I also experimented with doing hash browns for the bottom of half of them and that was equally tasty. 

I did the beginning steps with the bacon and french toast the night before, then covered the pan in plastic wrap and threw it in the fridge. All I had to do day of was preheat the oven and crack the eggs, and then sip a Bloody Mary while they cooked. 


Monday, May 21, 2012

Brussels Sprouts with Bacon and Shallots

Recipe Review- You'll forget these are vegetables they taste so good! Even people who don't normally like Brussels sprouts will gobble these up.


We never had Brussels sprouts growing up. I'm not really sure why. Maybe because of the connotations that Brussels sprouts are not kid friendly. I've heard them described as bitter before. I'm not sure what kind of preparation said sprouts are undergoing because since trying them in my adult life I've never met a Brussels sprouts recipe that I didn't like. Steamed, stir fried, broiled or baked I find them delish- but this quick prep is a crowd pleaser. Its only has a few ingredients and steps. Sometimes simple is the best. Plus- who doesn't like bacon! I'm pretty sure that shallots and bacon can make almost anything taste better.


Brussels Sprouts with Bacon and Shallots
adapted from recipe by Rachel Ray

4 slices of bacon
1 large shallot
1.5 lbs Brussels Sprouts
Salt & Pepper
1 cup chicken broth

Place bacon on a cold pan and heat until crispy- flipping periodically. Remove from pan but do not drain grease. Coarsely chop bacon and reserve. Add Shallots to the pan and cook until light brown. Prepare Brussels sprouts by removing bottom and slicing in half. Add Brussels sprouts and season with salt & pepper. Cook for 3-4 minutes and then add in broth. Bring to a simmer, then cover and reduce heat to medium low. Cook for 10 minutes or until softened. Drain and transfer sprouts to a serving dish. Mix and bacon and additional salt and pepper if needed. Serve immediately.

printable recipe 


Thursday, May 3, 2012

Pistachio Chai Muffins


Recipe Review: Spice and Tea flavored muffins with a hint of sweet and a nutty crunch. Perfect if you don't like overly sweet breakfast pastries. 


I was reading last months Cooking Light when an article mentioned a Chai & Pistachio Breakfast muffins.  The recipe instantly went to the top of my "to make" wish list. I hate how most of the baked good breakfast options are super sweet. Don't get me wrong- I love dessert- just not first thing in the morning. These muffins are much more savory than they are sweet. The flavors were surprising, and although they are quite different from any muffin I've had before- I really liked them

Pistachio Chai Muffins

1 3/4 cups flour
1/2 cup packed brown sugar
1 teaspoon baking powder
1 teaspoon baking soda
1/4 teaspoon salt
2 chai tea bags
1 cup low-fat buttermilk
1/4 cup butter, melted
1 1/2 teaspoons vanilla extract
1 large egg, lightly beaten
1/3 cup shelled dry-roasted pistachios, chopped
1/2 cup powdered sugar
1 tablespoon water

Preheat oven to 375°.

Combine flour, brown sugar, baking powder, baking soda, and salt in a large bowl. Stir with whisk until combined. Cut open tea bags; add tea to flour mixture, stirring well. Combine buttermilk, butter, 1 teaspoon vanilla, and egg in a bowl, stirring well with a whisk. Add buttermilk mixture to flour mixture, stirring just until moist.

Place 12 muffin-cup liners in muffin cups; coat liners with cooking spray. Divide batter evenly among prepared muffin cups. Sprinkle nuts evenly over batter. Bake at 375° for 15 minutes or until a wooden pick inserted in center comes out clean. Cool for 5 minutes in pan on a wire rack.

Combine remaining 1/2 teaspoon vanilla, powdered sugar, and 1 tablespoon water, stirring until smooth. Drizzle glaze over muffins.

printable link


If you follow this blog you might have noticed that I haven't had a post in quite a while. April was a whirl wind. I took a trip to LA with my sister over Easter, and also started working a part time job. Things have settled down a little bit and I'm getting into a new routine. Hopefully now that I've adjusted I'll be able to fit blogging in more easily. I really have missed it! New advances since I've updated is I am now a pinterest addict (who isn't) So if you'd like to follow me you can find me here!